In our previous iPhone VoiceOver tutorial, we took the time to explore and learn the different sections of the phone, physically and on screen, as well as some basic iPhone VoiceOver gestures. Some of the topics covered in that lesson are:
- What is VoiceOver on iPhone
- How to turn on VoiceOver on iPhone
- How to turn off VoiceOver on iPhone
- iPhone VoiceOver shortcut
- Navigating the Status Bar
- The Control Centre
- The Notifications Centre
- The App Switcher
- What is Siri
- How to activate Siri
To review the information and the gestures explained in that lesson, visit “How to Use VoiceOver on iPhone: A Look at How Blind People Can Use iPhones Too.”.
Now that you know the basics, we will be using this lesson to delve deeper into a few other iPhone VoiceOver gestures which will allow you to have much more functionality with your iPhone as a blind or visually impaired person. We will also take a look at the VoiceOver Rotor and the Zoom feature.
On a side note, do you need help learning how to use your Windows computer? Our Windows lessons for visually impaired persons starts with “the Keyboard“.
One Finger iPhone VoiceOver Gestures
- One finger double tap and hold – This gesture is one which they call a “pass through” gesture as it allows you to temporarily bypass the screen reader without having to disable it. For example, if you one finger double tap and hold then immediately swipe up, the screen will scroll down as if VoiceOver is not active.
- One finger triple tap – performs the function of a long press. You will get a menu of options from which you can select an action to activate. The menu listing obtained will depend on the item on which the gesture is performed.
- One finger swipe up – goes to the next item based on the rotor selection. We will discuss the rotor in more detail below, but just to note that this gesture allows you to cycle through options in a rotor setting. Swiping down will go in the opposite direction.
Two Finger iPhone VoiceOver Gestures
- Two finger touch – tapping the screen once with two fingers will toggle the speech of VoiceOver. That means if VoiceOver is speaking, performing a two finger touch on the screen will interrupt speech. Doing the same action again will restart VoiceOver and the screen reader will begin reading from where it left off.
- Two finger triple tap – opens the items chooser. This handy little trick will help you to find a specific thing on your screen quickly. The Item Chooser brings up in a list all the items found on your screen. It even has a search bar for quicker navigation.
- Two finger quadruple tap – opens the VoiceOver quick settings. In this menu, you can quickly change settings like audio ducking, typing feedback, speaking notifications, turn on and off sounds and much more. This is another nifty gesture as it allows you to make those VoiceOver settings changes quickly, without having to go the long way.
- Two finger swipe down – VoiceOver reads from current cursor position to end. So if you want to start reading a document from a particular paragraph to the end, just navigate to that paragraph and perform this gesture. VoiceOver will read from that paragraph to the end for you.
- Two finger swipe up – VoiceOver will read from the very beginning to the end.
Three Finger iPhone VoiceOver Gestures
- Three finger single tap – reads item summary.
- Three finger double tap – mutes and unmutes the speech of VoiceOver. So VoiceOver will still be active; that is, as a blind person you can still touch the screen without fear of activating anything as the “explore by touch” feature is still in effect. However, the speech will be off. This can be handy if you are listening to music or a programme on your iPhone and could do without the disturbance of VoiceOver reading out notifications.
- Three finger triple tap – toggles and off the screen curtain. This feature makes the screen go black, nothing can be seen on the screen even though the phone is on and running. The screen curtain allows blind and visually impaired persons some privacy. You can navigate your iPhone without prying eyes.
- Three finger quadruple touch – copies speech to the clipboard. In other words, if you perform this gesture, all of what was just said by VoiceOver will be copied to the clipboard and available to be pasted elsewhere.
Zoom
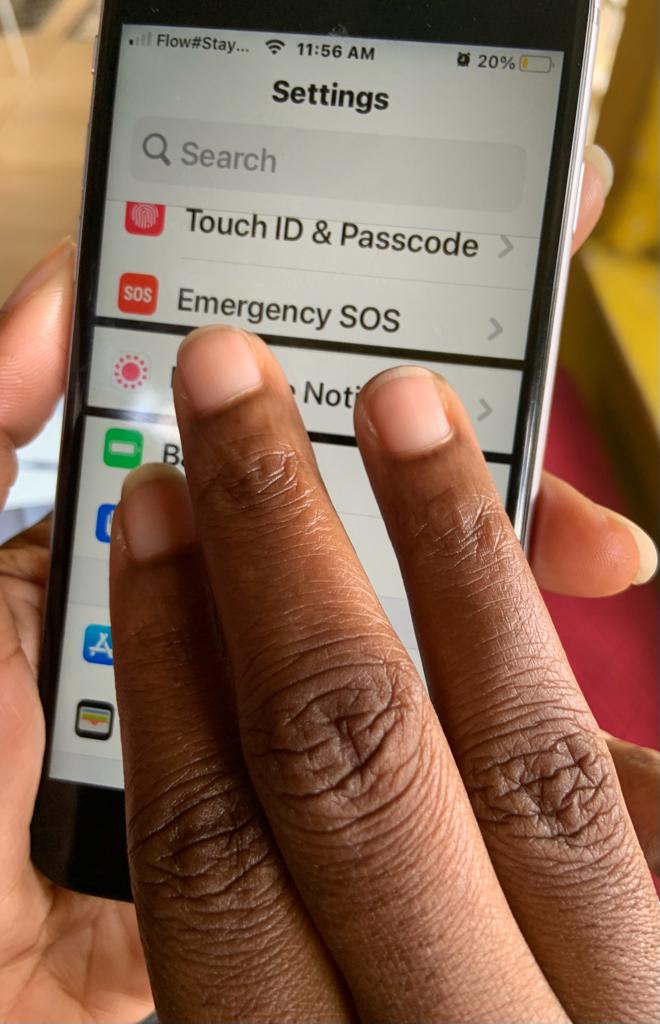
The Zoom feature is useful for those persons who have some useable vision. Say you want to see a picture better, you could activate the Zoom. This would allow you to magnify the whole or part of the screen to significant magnification levels which would help you to analyze the picture better. To activate Zoom, go to Settings, Accessibility and then Zoom.
Once Zoom has been activated, you will have access to additional gestures which control the feature. Performing a three finger double tap will initiate Zoom, which is magnifying the screen. Does this gesture look familiar? Yes it is, you are not crazy. You are right, this gesture is mentioned above with the corresponding action of stopping VoiceOver speech. However, the function of that gesture changes to accommodate Zoom. How then do you stop the speech? Whenever Zoom is active, every other gesture in the three finger spectrum is performed by adding one additional tap. That means, to stop speech, you would have to do a three finger triple tap. To activate the screen curtain, you would have to do a three finger quadruple tap. To copy speech to the clipboard, you would have to do a three finger quintuple tap or tap five times. Yes, that is how it goes, try it and see!
VoiceOver Rotor
We must now turn our attention to the VoiceOver Rotor. This is a very important feature that blind and visually impaired persons using VoiceOver must learn to manipulate. To activate the Rotor, use two fingers to perform a twist or turn-like gesture, much like you are turning a cork on a bottle. Preferably, use the fore finger and thumb to do this.
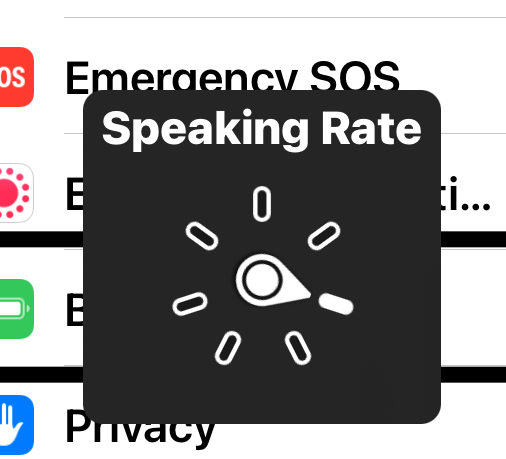
Every time the Rotor is turned, VoiceOver will announce another Rotor item. You will hear items like speaking rate, words, characters, edit etc. For each of these items, you can flick or swipe up or down through the options specific to that item. For example, if you turn the Rotor to speaking rate, swiping up will increase the rate at which VoiceOver speaks. Conversely, swiping down will decrease the rate.
Let us use another example. Say you have VoiceOver reading a document for you. Suddenly you hear a word that you would like to hear spelt. Here is what you could do:
- Turn the Rotor to “words”.
- Swipe down to navigate word by word to the word you want to have spelt.
- Upon reaching the word, turn the Rotor again, this time to “characters”.
- Swipe down to go through the word character by character.
Going through the word by characters means you are hearing the word being spelt. Very convenient, right?
The Rotor is very helpful. You can alter the items that appear in your Rotor. Just navigate to Settings, Accessibility, VoiceOver and then Rotor. Here you can add or remove items from the Rotor.
There are other iPhone VoiceOver gestures that you can use, we just focused here on those that might be used more often. To see other gestures, go to Settings, Accessibility, VoiceOver, Commands and Touch Gestures on the iPhone.
That is it for this lesson. Remember, you can visit the previous lesson to get information on other basic iPhone VoiceOver gestures, the Status Bar, the Control Centre, the Notifications Centre and the App Switcher. Or, feel free to check out our lessons teaching blind and visually impaired persons how to use a Windows Computer.