
Learning the keyboard is essential for a blind or visually impaired person who intends to use the computer efficiently. The keyboard is the main input device such a person will use, and as you are unable to see the names of the keys, it follows that you must know where they are by heart. This document seeks to describe the positioning of the various keys on a standard Windows keyboard (U.S. layout). There may be slight variations especially as it relates to that of laptops. There are some keyboards that come with additional buttons than what is described here but the keys spoken here are the ones you will need to know. Do not worry if you are not remembering all the keys as quickly as you would like, remember it is a learning process and full mastery comes with time and practice.
Do remember also that, no, visually impaired people do not need special computer keyboards. We use the same keyboard that sighted people are accustomed to, we just learn it a slightly different way.
Tip: To explore your keyboard in order to learn it and not interfere with the workings of the computer, put your screen reader into help mode. Both JAWS and NVDA go into help mode when you press the keystroke Insert [or Caps Lock] + 1. Perhaps you could ask for assistance to get this keystroke pressed since your being on this page may imply that you do not yet know your keys. Additionally, American Printing House for the Blind has a wonderfully accessible talking typer which you can access freely online. Go to their “Typer Online” application page to practice your keyboarding skills. Read their User Guide page to learn how to use the typer.
The Escape and Function Keys
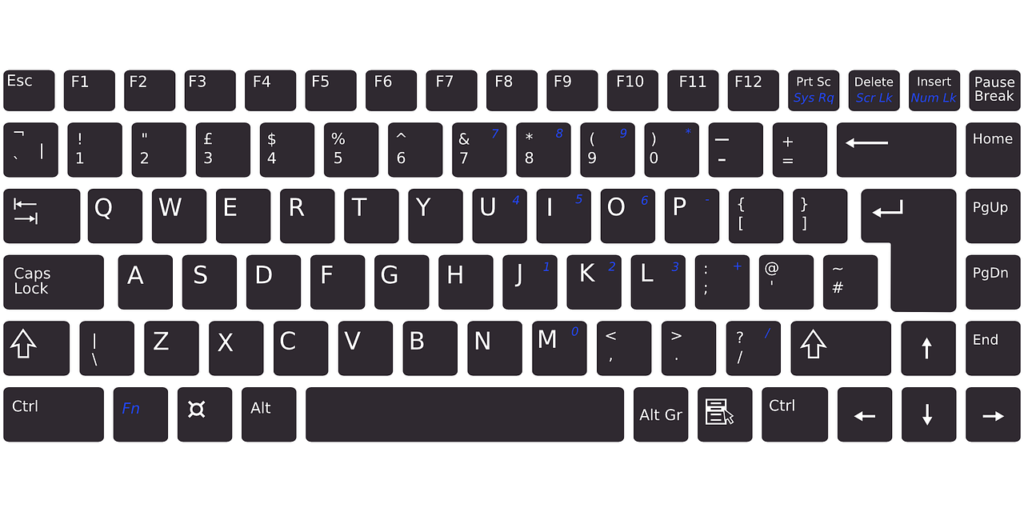
The very first button to the top, left of the keyboard is the Escape key. It is a stand-alone key up at the top there and serves to cancel certain functions when operating the computer.
To the right of the “Escape” key are twelve buttons laid out in one row but appearing in three groups of four buttons. These are the Function keys, F1 – F12.
Print Screen, Scroll Lock and Pause
Still going across to the right, we will find another group of three buttons. They are the Print Screen, Scroll Lock and Pause keys respectively. Visually impaired people do not often use these keys, but it is important for you to know them in relation to the position of other keys.
The Cursor Control Keys
The cursor control keys move the cursor. The cursor is a flashing bar on the computer’s screen and it denotes the current position of focus. They include a group of six buttons and the arrow keys. Just below the Print Screen, Scroll Lock and pause is a group of six buttons huddled together, let us call them the “pack of six”! Some keyboards have these buttons set mostly in a horizontal way with three buttons at the top and three at the bottom. Others have them set more vertically with two columns of three buttons.
The former described is the most common layout. The first button at the top is Insert. Directly under that is the Delete key. The second button at the top is Home and the button End is right below it. Home and End perform opposite functions, as you will come to learn when you actually start using the computer, so their juxtaposed positions on the keyboard reflect that fact. The third and last button at the top is the Page Up key and that is followed by the Page Down key below it. Again, these two keys are opposite in nature as it relates to their functions and so are placed opposite each other. Those associations should help you to remember them a lot easier.
Under the pack of six you will feel some space with one button sticking out above three other keys. These are your arrow keys. The top one that is alone in its row is the Up arrow. Directly under the Up arrow and in the middle of the other three bottom keys is the Down arrow. To the left of the Down arrow is the Left arrow and to the right is the Right.
The Alphanumeric Keys
Let us now get into the biggest area on the keyboard. At the extreme left, bottom end of the keyboard is the left Control key. Above that is the left Shift key. Still going up on that same left side of the Alphanumeric pad [or what we like to call the main pad] there is the Caps Lock key. This key is both third from the top and third from the bottom of this same main pad. Above the Caps Lock key is the Tab key and above that is the Grave key. The Grave key is the first key on the left side of the main pad. Notice if your fingers travel further up that there is a space, an further up you will feel again the Escape key. See the positioning?
Let us stick with the Grave key and go across to the right of the top of the main pad. Immediately following Grave is the number row. The buttons are numbered one through nine and then zero. Still continuing across, the button that follows Zero is Dash, followed by Equals and then Backspace which is the last button at the top of the main pad.
Coming down on the right hand side of the main pad is the Back slash key which is directly below Backspace. Below that is Enter. The Enter key, just like the Caps Lock key, is third from the top and third from the bottom but it is on the right side while the Caps Lock is on the left of the main pad. Below Enter is the right Shift key and, below that, the right Control key. Both bottom edges of the main pad have Control buttons with Shift buttons above.
Let us now explore the bottom of the main pad. Beginning at the right Control key and going left you will find the Applications key, then the right windows key and then the right Alt. After the right Alt key is a very wide key, the biggest key on the keyboard, this is called the Spacebar. Leaving the spacebar and still going left is another alt, the left Alt key. That is followed by the left Windows key and then we would end up back again on the left Control key. Both sides of the “Spacebar” are almost identical except for one key, the “Applications” key which only appears on the right.
The Typing Keys
We are still on the main pad but now getting into keys that we use for typing. In order to learn these keys, you will have to learn the correct way to type. Setting your fingers in the correct typing position will help you learn these keys faster and type at the speed and accuracy of any sighted person.
The Right Hand
First, find your “Spacebar”. From there, count two rows up. In that row, you will feel two buttons with a little bump or a little dash on them. Rest your right index finger on the right bump and then line out the other three fingers of your right hand on the three keys that are to the immediate right of the bump or the letter “J”. Your middle finger will be on “K”, your ring finger on “L” and your pinky or little finger on “;” [semicolon]. Therefore, the keys “J, K, L and semicolon” are the home keys for the right hand. Rest your thumb on the Spacebar.
The right index finger does not only press “J”, but it also goes up to press “U” and to the left to press “Y”. Across from the “J” to the left, the right index finger also presses “H”. It then also goes down to press “M” and to the left of that “N”.
The right middle finger presses three keys. In addition to “K”, it goes up to press “I” and goes down to press “,” [comma].
The right ring finger also presses three characters in general. Along with pressing “L”, it also presses “O” and goes down to press “.” [full stop].
The right little finger presses three characters too. In addition to “;” [semicolon], it also goes up to press “P” and goes down to press “/”.
The Left Hand
Remember that two rows above the Spacebar is a row with two buttons with markers or bumps on them? Good you remember. We have already explored the right hand beginning with the button with the marker on the right. Now find the key on the left with the marker or bump. That is the “F”. Place your left index finger on this key and line up the remainder of your fingers along the three keys falling directly to the left of the “F”. The home keys for the left hand are “A, S, D and F”. Again, place your left thumb on the Spacebar.
The left index finger not only presses “F: but it goes up to find “R” and further right to find “T”. It goes to the right of the “F” to press “G”. Then it goes down and presses “v’ and further right “B”.
The left middle finger presses three keys. Its home key is “D”, but it also goes up to press “E” and goes down to press “C”.
Next is the left ring finger. Its home key is “S”, but it also goes up to press “W” and goes down to press “X”.
The left little finger also presses three keys. Its home key is “A”, and it goes up to press “Q” and goes down to press “Z”.
That is it for typing keys! It must also be noted, however, that many of the keys on the Alphanumeric pad have dual functions. The functions noted above are the main functions but some of those keys have another function. To access these alternative functions, Press and hold the Shift key and then press the other key. For example, Shift + / gives the question mark, Shift + 1 gives the exclamation mark. As we highlighted above, you can put your screen reader in help mode by pressing Insert + 1 [or Caps Lock + 1in laptop mode] to explore the keys without fear of affecting the functioning of the computer.
Note also that the screen reader NVDA tells its users of some punctuation marks using different words. For example, NVDA says “bang” for exclamation mark and “tick” for apostrophe. Just get familiar with your screen reader and you will be fine.
Numeric Pad
Finally, there is the Numeric pad [Num pad for short]. This section can be found to the extreme right of the standard keyboard. Please note, some laptops do not have this section. Remember the markers which help us to find “F” and “J” on the Alphanumeric pad? There is a button on the Num pad which also has such a marker so go ahead and see if you can feel and find it. The key with the bump is the number 5. All the other number keys are lined up numerically, the lowest numbers are at the bottom. 1, 2, 3 are in the row below the 5; 4, 5, 6 are in the middle row and 7, 8, 9 are in the row above the number 5.
There are other keys surrounding the number keys in the Num pad. The very first key on the top, left on this pad is the Num Lock key. This key toggles on and off the numeric functioning of the keys. Beside the Num Lock to the right is divide, multiply and minus. Below the minus is the plus, which is a long key, followed by another long key which is the Num pad Enter. At the very bottom of the pad, the decimal point is to the left of the Enter followed by 0 which is further left.
Here ends our description of the keyboard in a way that blind and visually impaired persons can appreciate. Do not feel pressured into learning all of these keys in one go. No, that is not how it goes. If you are consistent at practicing a few times a week, then you should be able to learn them all in a matter of weeks. Remember, you can make use of American Printing House’s “Typer Online” to help you practice. Just keep practicing, good luck!
Need More Help?
If you have questions about this lesson, try the free BAT Accessibility Assistant. It can answer questions about NVDA, screen readers, Windows keyboard shortcuts, Microsoft Word, VoiceOver, ChatGPT, and many other accessibility topics.
Ask the BAT Accessibility Assistant