Now we are getting into the fun part, into the nitty-gritty of learning how to make our documents look the way we want them. We are going to look at how to change the way the text that we are typing is presented.
Before beginning any form of character formatting, please note that it is advisable that you first finish typing your entire document. This is because you could opt to change the formatting on one particular area of text but then inadvertently continue to bring that formatting into other areas of text as you are visually impaired and are not seeing the text readily. For instance, you typed the heading for your document and fixed up the formatting so that it looks like a heading. However, you continue to edit the document at another time by pressing Space or Enter beside this heading, not remembering that you had altered the text formatting. The result is that everything typed thereafter will look like the heading and you would not realize it until you think to check the formatting. It now becomes a whole mess to fix!
So of course we remember that sometimes there are many different ways to complete a task on the computer. Character formatting is no different. There are three main ways:
Using Keystrokes
The quickest way to do character formatting as a blind or visually impaired person is to use some keystrokes. First select the text that you want to format and then press:

- CTRL + B – to bold text [make text appear brighter than the remainder of text, text stands out].
- CTRL + I – italicizes text [makes text appear curved, used to place emphasis on particular words].
- CTRL + U – places a single underline under selected text.
- CTRL + D – opens the font dialogue box where a myriad of other text formatting options can be found.
How to navigate the Font dialogue box? Simply use the Tab key to move through all the various options. If you would like to change a selection on one of the options, just use the arrow keys to change selections or use the Space-bar to check or uncheck check-boxes. When you think you are finished with the dialogue box, Tab to the OK button and press Enter. The box closes and all changes made will be applied to selected text.
Let us do an example. We selected some text and now we want to change the font, font style and font size of the text. You could choose to head to the Font dialogue box as all these modifications can be made with one go inside there. Press CTRL + D. Upon entering the box, you are immediately placed in the area where you can change the type of font. Use the Up or Down arrows to go through the fonts.
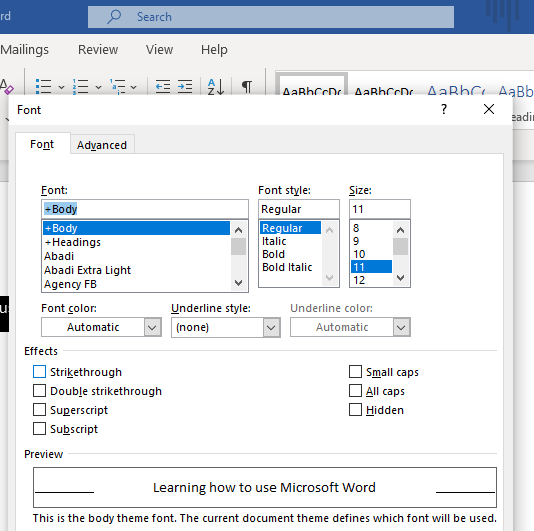
Hint: There are several types of fonts so if you are looking for a specific font, use first letter navigation to get to it faster. That is, to find Tahoma for example, type the letter “T” then press Down arrow to hear all the fonts beginning with “T”.
After landing on the desired font, leave the selection there and move away and on through to other options in the box with the Tab key. You will then hear “Font Style”. Again, use Up or Down arrows to alter this option. Move again with the Tab key until you hear “Font Size” and again use the arrow keys to select a font size. We are now finished with all the changes we had wanted to make so now just Tab to the OK button and hit Enter. That is it! Our text now looks how we want it.
Using the Menu Ribbons
As discussed in a previous lesson which demonstrates how to navigate the menu ribbons in Word, the menu has all options. So it follows then that the options for formatting text can also be found there. Press Alt to access the menu ribbons. The first menu tab mentioned will be “Home”. Upon hearing this press Tab to move through the lower ribbon associated with this tab. You will eventually hear options like font, font size, grow or shrink font, bold, italics etc. Just press Enter on any of these options that you would like to activate.
Using the Applications Key
You can also use the Applications key to bring up the context menu. Down arrow through this menu until your screen reader announces “Font”. Pressing Enter will open the Font dialogue box. You would then navigate this box as described above to change options.
How Do I Know What Formatting is on my Text?
From time to time you will want to know what formatting you have on a section of text. How does a blind or visually impaired person do this? Press Insert + F. The screen reader will begin to read to you the formatting that is present including font, font size, font style. Pressing the keystroke Insert + F twice quickly in some versions of Microsoft Word will allow your screen reader to open a dialogue box listing all the formatting elements on the text. You can use the Up or Down arrows to go through them individually. When finished with this box, just hit Escape to remove it from your screen.
Take Away Keystrokes
| Keystroke | Function |
| CTRL + B | Bolds text |
| CTRL + I | Italices text |
| CTRL + U | Single underlines text |
| CTRL + D | Opens Font dialogue |
| Insert + F | Allows screen reader to list all formatiing present on selected text |
| Insert + F twice quickly | Opens dialogue with list of types of formatting present on text |